
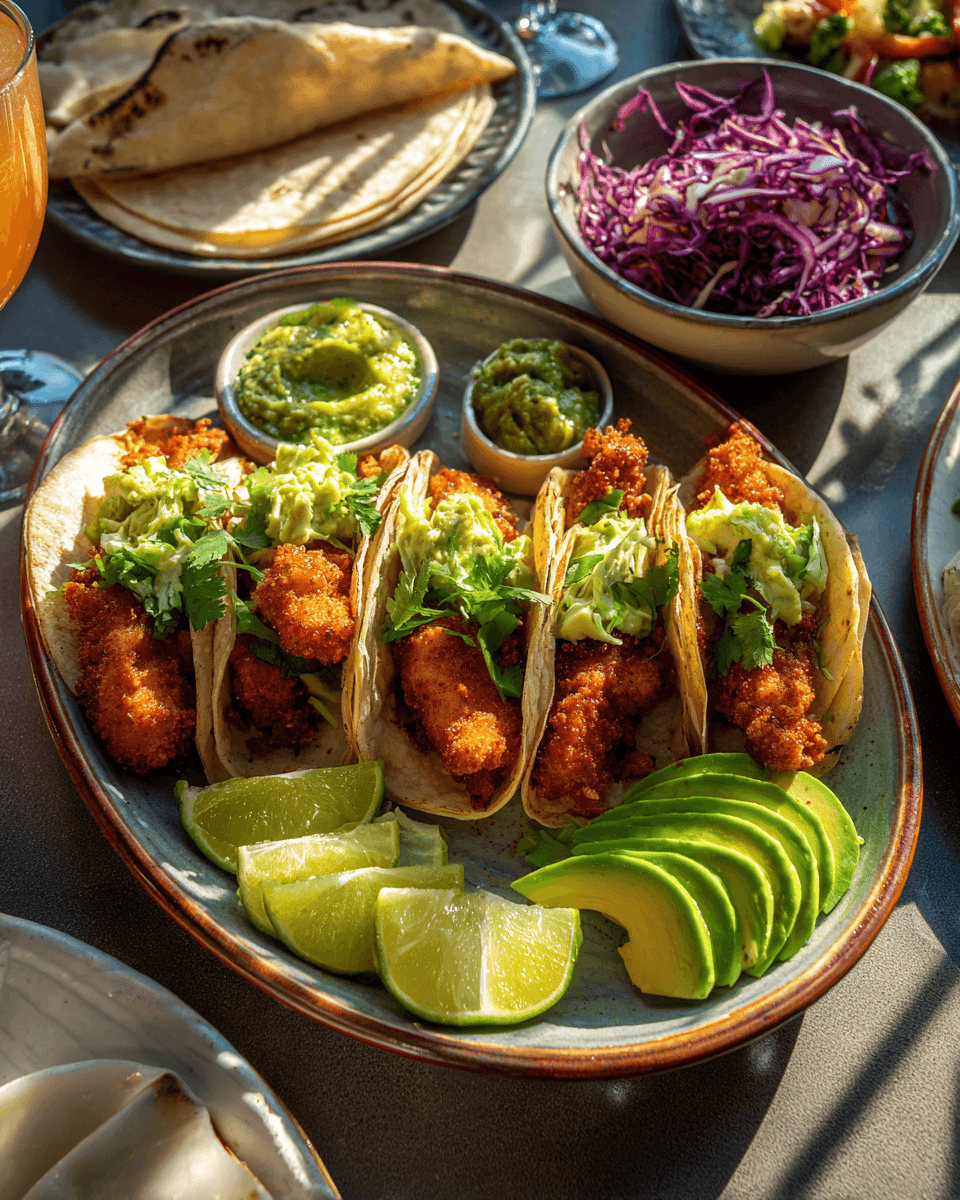
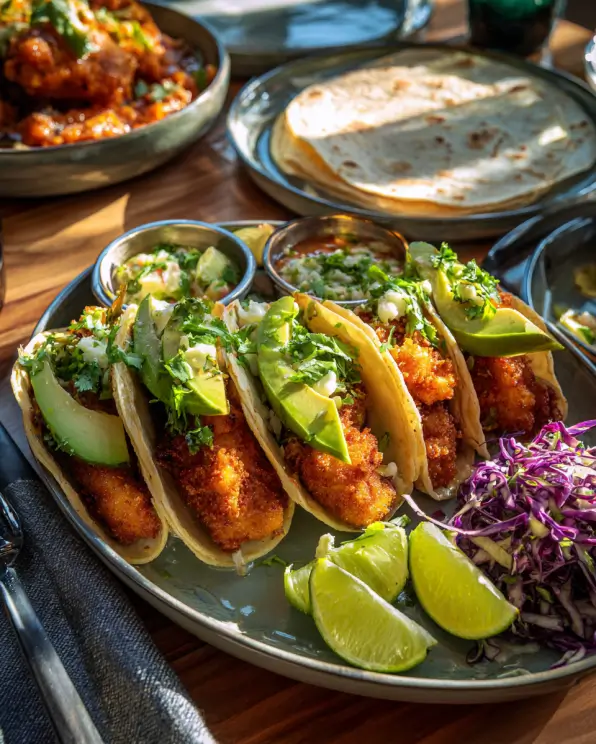
There’s something irresistible about finger food that’s crunchy, golden, and full of flavor. These Crunchy Chicken Taco Fingers hit all the right notes: tender chicken on the inside, a crisp taco-spiced coating on the outside, and the perfect excuse to bring out your favorite dipping sauces. They’re a fun twist on taco night and make an easy weeknight dinner, game-day snack, or party platter that disappears in minutes.
What I love most is how this recipe delivers that fried crunch—without the fryer. A hot oven, a simple spiced breadcrumb coating, and juicy strips of chicken are all you need. You can keep things classic with salsa and sour cream, or get creative with different dips and toppings. And if you’re into baked alternatives that still taste indulgent, you’ll love browsing Skinnytaste’s collection of healthy comfort foods for even more inspiration.
Ingredients You’ll Need
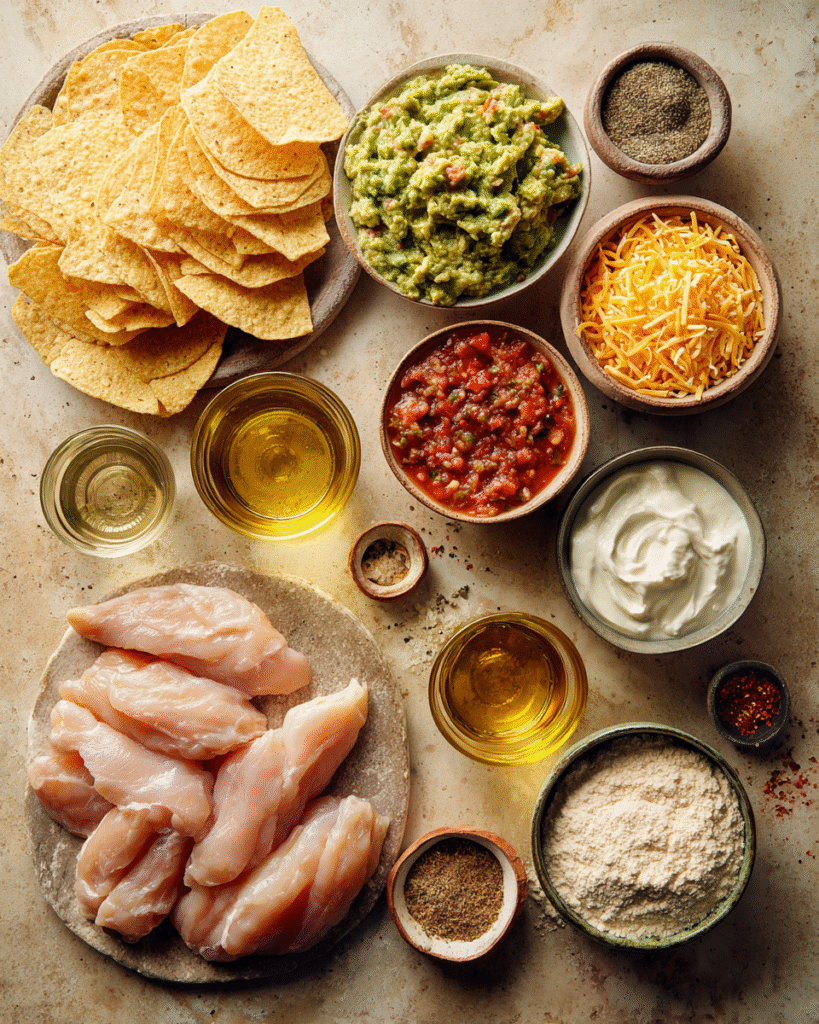
You don’t need a long list of fancy items—just a few simple pantry staples and fresh chicken. Here’s everything to have ready:
- Chicken breast (boneless, skinless) – Cut into strips or “fingers.” Chicken breast keeps things lean, but you can swap with thighs if you like juicier meat.
- Taco seasoning – The flavor backbone! You can use a store-bought packet or make your own blend of chili powder, cumin, paprika, garlic, and onion powder.
- Breadcrumbs (panko works best) – Panko breadcrumbs create that extra-crunchy texture, while regular breadcrumbs give a more classic coating.
- Corn chips or tortilla chips (crushed) – Mixing these into your crumbs adds even more crunch and taco flair.
- All-purpose flour – Helps the coating stick to the chicken.
- Eggs – Acts as the “glue” between flour and crumbs, locking in the coating.
- Salt & pepper – A simple seasoning boost.
- Cooking spray or a drizzle of oil – Essential for that golden, crispy finish in the oven.
Pro Tip: Crush your corn or tortilla chips finely but not into powder—you want those uneven little bits for extra crunch and texture.Ingredients You’ll Need
You don’t need a long list of fancy items—just a few simple pantry staples and fresh chicken. Here’s everything to have ready:
- Chicken breast (boneless, skinless) – Cut into strips or “fingers.” Chicken breast keeps things lean, but you can swap it with thighs if you like juicier meat.
- Taco seasoning – The flavor backbone! You can use a store-bought packet or make your own blend of chili powder, cumin, paprika, garlic, and onion powder.
- Breadcrumbs (panko works best) – Panko breadcrumbs create that extra-crunchy texture, while regular breadcrumbs give a more classic coating.
- Corn chips or tortilla chips (crushed) – Mixing these into your crumbs adds even more crunch and taco flair.
- All-purpose flour – Helps the coating stick to the chicken.
- Eggs – Acts as the “glue” between flour and crumbs, locking in the coating.
- Salt & pepper – A simple seasoning boost.
- Cooking spray or a drizzle of oil – Essential for that golden, crispy finish in the oven.
Pro Tip: Crush your corn or tortilla chips finely but not into powder—you want those uneven little bits for extra crunch and texture.
Step-by-Step Instructions
Making these taco-spiced chicken fingers is as fun as eating them. Here’s how to get that crispy, golden coating without ever turning on the fryer:
- Preheat and prep
Set your oven to 400°F (200°C). Line a baking sheet with parchment paper or lightly grease it. This helps the chicken crisp up without sticking. - Prepare your coating station
Grab three shallow bowls:- One with flour (seasoned with a pinch of salt and pepper).
- One with beaten eggs.
- One with your breadcrumb mixture (panko + crushed tortilla chips + taco seasoning).
- Coat the chicken
Dip each chicken strip first into the flour (shake off the excess), then into the egg, and finally into the crumb mixture. Press gently to make sure the coating sticks well. - Arrange for baking
Lay the coated chicken fingers in a single layer on your prepared baking sheet. Lightly spray or drizzle with oil—this is what helps them turn golden and crunchy in the oven. - Bake to perfection
Slide the tray into the oven and bake for 18–20 minutes, flipping halfway through. The chicken should be crisp and golden on the outside and juicy on the inside. - Serve hot
Let them cool for a minute or two (they’ll be piping hot straight out of the oven!), then serve with salsa, guacamole, sour cream, or your favorite dipping sauce.
Sensory moment: As they bake, you’ll smell the warm spices of taco seasoning blending with toasty crumbs—it’s the kind of aroma that makes everyone drift into the kitchen asking, “Are those ready yet?”
Tips & Variations
One of the best things about these baked chicken taco fingers is how flexible they are. You can tweak the spices, change up the coating, or pair them with new dips to keep things exciting. Here are some ideas to get you started:
Flavor Twists
- Cheesy Crunch – Mix finely grated Parmesan or cheddar into the breadcrumb coating for an extra layer of flavor.
- Spicy Kick – Add a pinch of cayenne or crushed red pepper flakes to your taco seasoning if you like heat.
- Herby Freshness – Stir chopped cilantro or parsley into the crumb mixture for a bright, fresh finish.
Dip It Your Way
- Classic Salsa & Sour Cream – Always a crowd-pleaser.
- Guacamole – Creamy avocado balances the crunchy coating perfectly.
- Chipotle Mayo – Smoky, spicy, and addictive.
- Ranch Dressing – For those who love a cool, herby dip.
Storage & Reheating Tips
- Fridge – Store leftovers in an airtight container for up to 3 days.
- Freezer-Friendly – Freeze uncooked, coated chicken fingers on a tray, then transfer to a bag once solid. Bake straight from frozen, adding 5 minutes to the cooking time.
- Reheating – Pop leftovers back in a 375°F (190°C) oven for 8–10 minutes to bring back the crunch (skip the microwave—it makes them soggy).
Pro Tip: Double the batch and freeze half—you’ll thank yourself on busy weeknights when a tray of crunchy, taco-spiced goodness is just 20 minutes away.Tips & Variations
Serving Suggestions
These crunchy chicken taco fingers are more than just a snack—they’re the kind of dish that works for game day, family dinners, or even a fun party spread. Here are some tasty ways to serve them:
Family Dinner Style
- With Taco Sides – Serve alongside Mexican rice, black beans, or a fresh corn salad to make them part of a complete meal.
- DIY Taco Night – Set out warm tortillas, shredded lettuce, cheese, and salsa so everyone can build their own taco wraps with the chicken fingers.
Party & Gathering Ideas
- Appetizer Platter – Arrange the chicken fingers on a big board with guacamole, salsa, sour cream, and chipotle mayo for dipping.
- Game Day Snack – Pair with nachos, loaded potato skins, and sliders for the ultimate crowd-pleasing spread.
- Kid-Friendly Feast – Serve with oven fries and carrot sticks for a crunchy, colorful dinner kids will love.
Presentation Tips
- Bright & Fresh – Sprinkle chopped cilantro and squeeze lime wedges over the tray for a restaurant-style touch.
- Mini Tacos – Tuck each chicken finger into a small tortilla with a spoonful of slaw for bite-sized tacos.
- Casual Charm – Serve in a basket lined with parchment paper—it looks fun and makes cleanup easy.
Pro Tip: Always serve with at least two dips—it makes the whole dish feel interactive and fun for guests.
FAQs About Crunchy Chicken Taco Fingers
1. Can I use chicken thighs instead of chicken breast?
Yes! Chicken thighs work wonderfully and stay extra juicy. Just cut them into strips and follow the same coating and baking process.
2. How do I make these extra crispy in the oven?
A light spray of oil before baking is key. Also, bake on a wire rack set over a sheet pan so hot air circulates around the chicken, crisping all sides evenly.
3. Can I make these ahead of time?
Definitely. You can coat the chicken fingers and refrigerate them for up to 24 hours before baking. Or freeze them uncooked and bake directly from frozen when needed.
4. What dips pair best with these chicken fingers?
Classic choices are salsa, sour cream, guacamole, or ranch. For something bolder, try chipotle mayo, queso dip, or a creamy avocado dressing.
5. How do I reheat leftovers without losing the crunch?
Reheat in a 375°F (190°C) oven for about 8–10 minutes. This brings back the crispy coating without drying out the chicken. Avoid the microwave—it softens the crumb coating.
6. Can I make these gluten-free?
Yes! Swap the flour for a gluten-free blend and use gluten-free breadcrumbs or crushed corn tortilla chips. The result is just as crunchy and flavorful.
Final Thoughts
These Crunchy Chicken Taco Fingers prove that baked doesn’t have to mean boring. With their golden, crispy coating and bold taco seasoning, they’re a snack or dinner that feels indulgent but is so much lighter than frying. They’re the kind of recipe that you’ll want to keep in your back pocket—quick enough for a weeknight meal, but also fun enough for parties, potlucks, or game day.
So the next time taco night rolls around, why not shake things up? Serve these with your favorite dips, a squeeze of lime, and watch them disappear faster than you can make them. And if you’re hungry for even more family-friendly dinner ideas, check out EatingWell for recipes that are as wholesome as they are delicious.
Happy baking—and happy dipping!
Print
Crunchy Chicken Taco Fingers (Baked) – Easy, Fun & Flavor-Packed
- Total Time: 35 minutes
- Yield: 4 servings 1x
Description
These Crunchy Chicken Taco Fingers are baked, not fried, but still deliver that irresistible golden crunch. Seasoned with taco spices and coated in a crispy crumb mixture, they’re the ultimate finger food for weeknight dinners, parties, or game day snacks.
Ingredients
1 lb (450g) chicken breast, boneless & skinless, cut into strips
½ cup all-purpose flour, seasoned with salt & pepper
2 large eggs, beaten
1 cup panko breadcrumbs
1 cup crushed corn or tortilla chips
2 tbsp taco seasoning (store-bought or homemade)
Cooking spray or a drizzle of oil
Instructions
Preheat oven to 400°F (200°C). Line a baking sheet with parchment or grease lightly.
Set up three bowls: flour (with salt & pepper), beaten eggs, and breadcrumb mixture (panko + crushed chips + taco seasoning).
Coat chicken strips: dip first in flour, then egg, then breadcrumb mixture. Press gently to help the coating stick.
Arrange chicken on prepared sheet in a single layer. Spray lightly with cooking oil for extra crispiness.
Bake for 18–20 minutes, flipping halfway through, until golden brown and cooked through.
Serve warm with salsa, guacamole, or sour cream for dipping.
Notes
For extra flavor, stir grated Parmesan or cheddar into the breadcrumb mixture.
To make spicier, add cayenne or chili flakes to the taco seasoning.
Store leftovers in an airtight container for up to 3 days. Reheat in the oven to restore crispiness.
Freeze uncooked, coated chicken strips on a tray, then transfer to a bag. Bake from frozen, adding 5 minutes to cooking time.
- Prep Time: 15 minutes
- Cook Time: 20 minutes
- Category: Dinner / Main
- Method: Baking
- Cuisine: Mexican-Inspired
Nutrition
- Serving Size: 3–4 chicken fingers
- Calories: 310 kcal
- Sugar: 2g
- Sodium: 480mg
- Fat: 12g
- Saturated Fat: 3g
- Unsaturated Fat: 8g
- Trans Fat: 0g
- Carbohydrates: 24g
- Fiber: 2g
- Protein: 28g
- Cholesterol: 120mg
Keywords: Crunchy Chicken Taco Fingers, Baked Chicken Fingers, Taco Chicken Strips, Healthy Finger Food