

There’s something about a warm, cheesy snack that makes any gathering feel instantly more special. Cheese straws are one of those classic recipes that have been passed down for generations, especially in Southern kitchens. I still remember my first bite at a holiday party—the crunch, the buttery layers, and that bold cheddar flavor with just the tiniest kick of spice. It was love at first bite! These little twists of golden perfection aren’t just delicious, they’re also fun to make and guaranteed to impress guests.
The best part? They require just a handful of ingredients, and you don’t need to be a baking pro to pull them off. Whether you’re planning a cozy family night or a festive brunch spread, these cheese straws will disappear faster than you can set them down. Plus, they’re endlessly versatile—you can keep them mild for the kids or add extra spice for a grown-up kick. If you’re curious about pairing snacks and drinks for entertaining, I highly recommend checking out this party appetizer guide for even more inspiration.
Ingredients You’ll Need
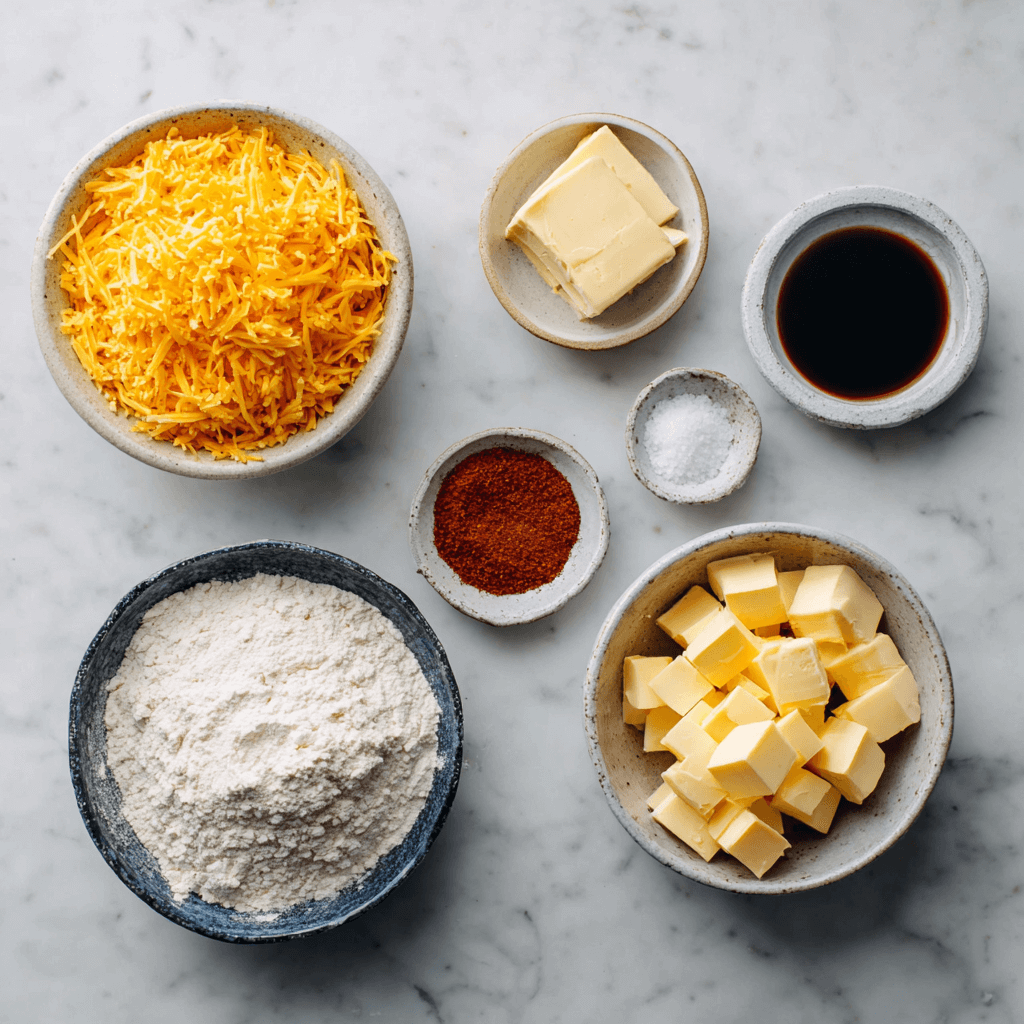
Cheese straws don’t require anything fancy—just a few simple ingredients that transform into something crispy, cheesy, and irresistible. Here’s what you’ll want to have on hand:
- Sharp cheddar cheese – The star of the show! Go for freshly grated cheddar (not pre-shredded) for the best melt and flavor.
- All-purpose flour – Helps give the dough structure and that perfect crunchy bite.
- Unsalted butter – Cold butter works best here, creating those light, flaky layers.
- Salt – Just enough to balance the richness of the cheese.
- Cayenne pepper (or paprika) – A pinch adds a gentle kick; adjust to taste depending on how spicy you like it.
- Egg – Beaten, for brushing the tops so the straws bake up golden and glossy.
Optional but fun add-ins: a sprinkle of sesame seeds, poppy seeds, or even a dash of garlic powder for a flavor twist.
How to Make Cheese Straws
Making cheese straws is easier than you think, and the process is actually pretty fun. Here’s a step-by-step guide to get that perfect crunch:
- Grate the cheese.
Start by shredding your sharp cheddar. Freshly grated cheese melts and blends more smoothly than the bagged kind. - Make the dough.
In a large bowl, combine the flour, salt, butter, and cheese. Use a pastry cutter or your fingertips to work the butter into the flour until the mixture looks crumbly. Add just enough cold water to bring the dough together—it should feel soft but not sticky. - Roll it out.
Lightly flour your surface and roll the dough into a thin rectangle, about ⅛ inch thick. Don’t worry about perfect edges—these straws are meant to look rustic. - Cut into strips.
Using a sharp knife or pizza cutter, slice the dough into long strips, about ½ inch wide. - Twist and place.
Gently twist each strip a couple of times and place them on a parchment-lined baking sheet. This gives them that signature “cheese straw” look. - Brush with egg wash.
Lightly brush the tops with beaten egg for that glossy golden finish. Sprinkle with a pinch of extra cheese or seeds if you’d like. - Bake to golden perfection.
Bake at 375°F (190°C) for 12–15 minutes, or until crisp, puffed, and lightly browned. Let them cool slightly before serving (they’ll firm up as they cool).
Tips & Variations
Cheese straws are wonderfully adaptable, which makes them perfect for experimenting in your kitchen. Here are a few ways to make them your own:
Cheese Choices
- Cheddar – Sharp cheddar gives that bold, classic flavor.
- Parmesan – Adds a salty, nutty kick—great for extra crunch.
- Gruyère or Fontina – Melt beautifully for a more gourmet twist.
Spice It Up
- Cayenne pepper – Classic for a subtle heat.
- Paprika or smoked paprika – Adds warmth and color without too much spice.
- Garlic or onion powder – For an herby, savory depth.
Fun Extras
- Seeds & toppings – Sprinkle with sesame seeds, poppy seeds, or “everything bagel” seasoning before baking.
- Shape play – Instead of twists, cut into rectangles or fun cookie-cutter shapes for parties.
- Kid-friendly – Skip the spice and keep it cheesy for little snackers.
Storage & Make-Ahead
- Store in an airtight container at room temperature for up to 3 days.
- Reheat in the oven for a few minutes to bring back crispiness.
- Freeze the raw dough strips on a baking sheet, then store in a freezer bag. Just bake straight from frozen, adding a few extra minutes.

Serving Suggestions
Cheese straws are one of those snacks that work just about anywhere—from casual family snacking to elegant holiday spreads. Here are some fun ways to serve them:
Party & Holiday Platters
- Arrange cheese straws in a tall glass or jar for a centerpiece snack.
- Add them to a charcuterie board alongside cured meats, nuts, and fruit.
- Pair them with sparkling wine or cocktails as a pre-dinner appetizer.
Dipping Fun
- Marinara sauce – For a pizza-like flavor combo.
- Ranch or herbed dip – Cool and creamy against the cheesy crunch.
- Honey mustard – Sweet and tangy for balance.
Everyday Snacking
- Pack a few in lunchboxes for a savory treat.
- Serve as a side with soups like tomato basil or potato leek.
- Offer them warm from the oven as an afternoon snack with tea or coffee.
These golden, crispy straws are versatile enough to feel fancy at a party or casual during a movie night—they’ll fit right in no matter the occasion.
Frequently Asked Questions
1. Can I make cheese straws ahead of time?
Yes! You can prepare the dough, cut and twist the straws, then freeze them on a baking sheet. Once frozen, transfer to a freezer bag and store for up to a month. Just bake straight from frozen, adding a couple of extra minutes to the baking time.
2. Why did my cheese straws turn out soft instead of crispy?
This usually happens if they’re too thick or underbaked. Roll the dough thin (about ⅛ inch) and bake until golden brown. Letting them cool on a wire rack also helps keep them crisp.
3. Can I use pre-shredded cheese?
You can, but freshly grated cheese melts and blends much better. Pre-shredded cheese often has anti-caking agents that affect the texture.
4. Do I need a food processor to make the dough?
Nope! A pastry cutter, fork, or even your fingertips will do the trick. The key is to keep the butter cold so you get those flaky layers.
5. How long do cheese straws stay fresh?
Stored in an airtight container at room temperature, they’ll stay crisp for about 2–3 days. For longer storage, freeze and reheat when needed.
6. Can I make them less spicy for kids?
Definitely! Just leave out the cayenne or paprika and stick with the cheese. You can even add a sprinkle of sesame seeds for fun instead of spice.
Final Thoughts
Cheese straws are one of those timeless recipes that feel both nostalgic and exciting every time you bake them. They’re crispy, buttery, and packed with cheesy goodness—perfect for parties, holiday spreads, or just a cozy afternoon snack. The best part? They look impressive without requiring hours in the kitchen, making them a true crowd-pleaser for busy hosts.
Once you try them, you’ll see just how versatile they can be. Switch up the cheeses, play with spices, or add fun toppings to suit your mood. However you make them, they’re sure to become one of those “most-requested” recipes in your kitchen. And if you’re building your snack menu, you might also love these easy appetizer recipes for even more inspiration. So preheat your oven, grab that cheddar, and get ready to enjoy a bite of crispy, cheesy bliss.
Print
Cheese Straws: Crispy, Cheesy & So Irresistible
- Total Time: 30 minutes
- Yield: About 24 cheese straws 1x
Description
These crispy, buttery Cheese Straws are the ultimate party snack! Made with sharp cheddar, a touch of spice, and simple ingredients, they’re perfect for entertaining, holiday gatherings, or cozy afternoon snacking.
Ingredients
-
1 ¼ cups all-purpose flour
-
½ cup (1 stick) cold unsalted butter, cubed
-
½ teaspoon salt
-
¼ teaspoon cayenne pepper (or paprika, for milder flavor)
-
2–3 tablespoons cold water (as needed)
-
1 egg, beaten (for brushing)
2 cups sharp cheddar cheese, freshly grated
Optional: sesame seeds, poppy seeds, or garlic powder for extra flavor.
Instructions
Preheat oven to 375°F (190°C). Line a baking sheet with parchment paper.
In a bowl, combine flour, salt, butter, and cheese. Work the butter into the flour with a pastry cutter or fingertips until crumbly.
Add cold water, 1 tablespoon at a time, until dough just comes together.
On a lightly floured surface, roll the dough into a rectangle about ⅛ inch thick.
Slice into ½-inch wide strips, then twist each into a spiral.
Place on prepared baking sheet and brush tops with beaten egg. Sprinkle with seeds or seasoning if desired.
Bake for 12–15 minutes, until golden and crisp. Cool slightly before serving.
Notes
For crispier straws, roll dough thinner and bake a few extra minutes.
Freshly grated cheese works best for flavor and texture.
Dough can be shaped and frozen raw, then baked straight from frozen.
- Prep Time: 15 minutes
- Cook Time: 15 minutes
- Category: Snack, appetizer
- Method: Baking
- Cuisine: American
Nutrition
- Serving Size: 2 straws
- Calories: 150 kcal
- Sugar: 0.5g
- Sodium: 210mg
- Fat: 10g
- Saturated Fat: 6g
- Unsaturated Fat: 3g
- Trans Fat: 0 g
- Carbohydrates: 10g
- Fiber: 0.5g
- Protein: 5g
- Cholesterol: 35mg
Keywords: cheese straws, cheesy snacks, party appetizer, Southern cheese straws