
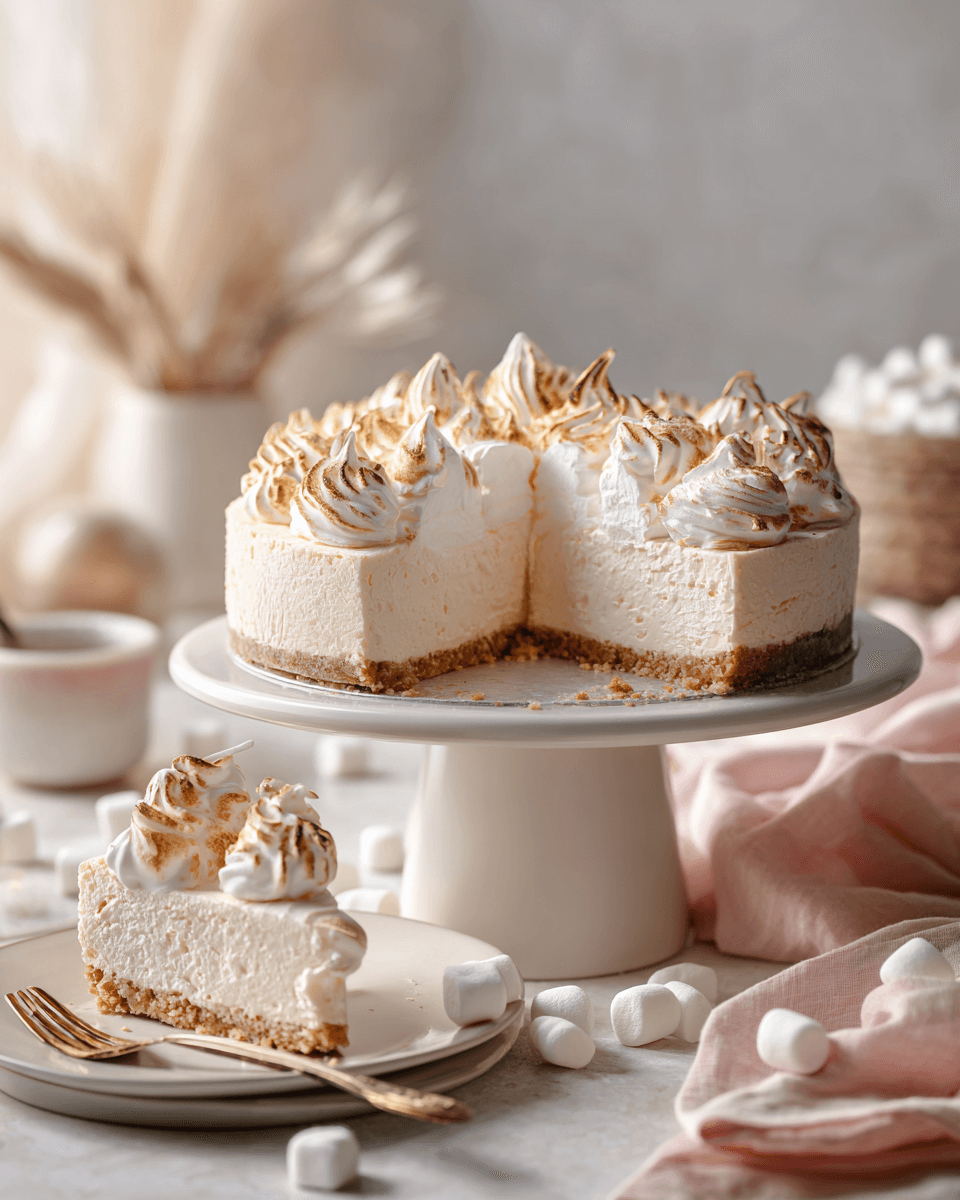
There’s something almost magical about desserts that don’t need an oven. You know the kind—those dreamy, creamy treats that come together with just a few simple ingredients but taste like you spent all day in the kitchen. That’s exactly how I feel about this Marshmallow Cheesecake. It’s the perfect balance of nostalgic and elegant, with a buttery graham cracker crust, a fluffy marshmallow-cream filling, and a whipped topping that melts in your mouth. If you’ve ever wanted a dessert that looks Pinterest-pretty but feels totally doable, this is the one.
When I first tried a version of this cheesecake years ago at a family get-together, I couldn’t believe how simple it was. Since then, I’ve tested (and tasted!) a few variations until I landed on this one—a no-bake wonder that’s equal parts cozy and impressive. The best part? You don’t need fancy tools or hours of prep. Just a few pantry staples and a little patience while it chills. And if you’re a fan of easy, no-bake desserts like this, you might also love this creamy chocolate mousse recipe from Sally’s Baking Addiction, which inspired me to explore more light, airy desserts.
Ingredients
This cheesecake comes together with simple pantry staples — but it’s the combination that makes it irresistibly fluffy and rich. Here’s everything you’ll need, divided into three easy parts: the crust, the filling, and the topping.
For the Crust
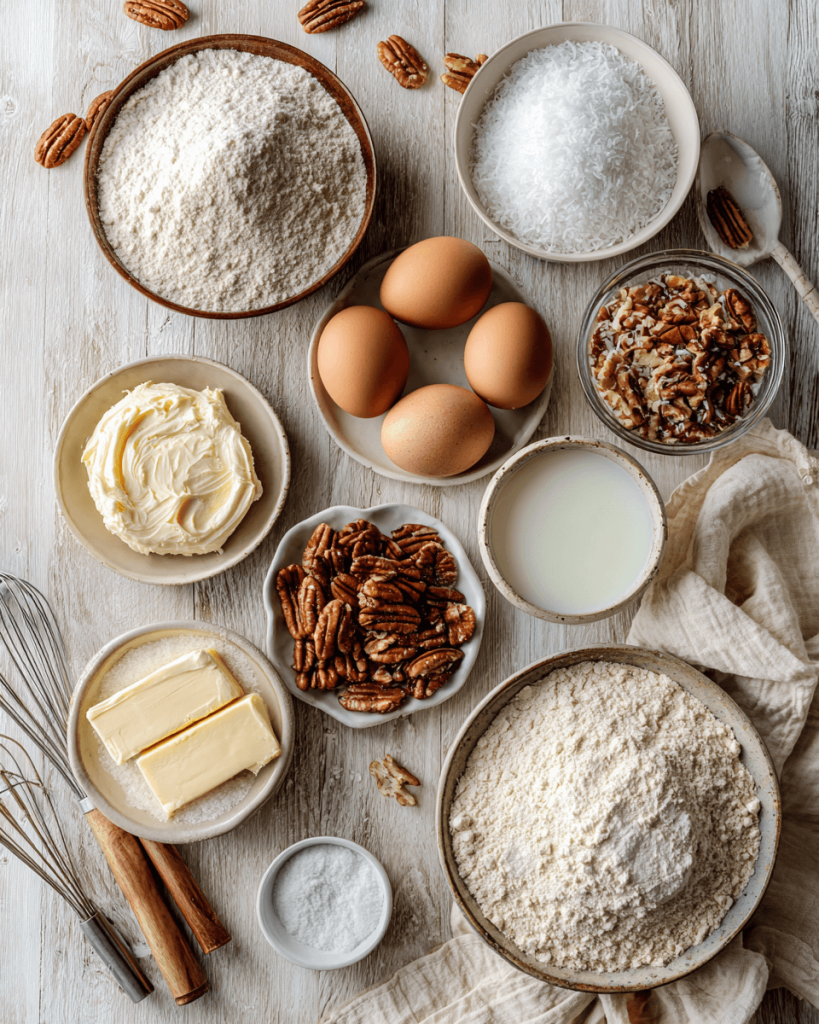
- 1 ½ cups graham cracker crumbs – You can crush whole crackers in a food processor or use store-bought crumbs for convenience.
- ¼ cup granulated sugar – Adds sweetness and helps the crust hold together.
- ½ cup unsalted butter, melted – The secret to a rich, buttery crust that stays firm when chilled.
Tip: Use real butter, not margarine, for the best flavor and texture.
For the Marshmallow Cheesecake Filling
- 8 oz cream cheese, softened – Make sure it’s at room temperature so it blends smoothly with no lumps.
- 1 cup marshmallow fluff (or crème) – The star of the show! Gives that signature gooey sweetness and light texture.
- ½ cup powdered sugar – Balances the tang of the cream cheese with a touch of sweetness.
- 1 teaspoon pure vanilla extract – Adds depth and warmth to the filling’s flavor.
- 1 cup heavy whipping cream – Whipped to soft peaks before folding in; this is what gives your cheesecake its dreamy, airy lift. Tip: Chill your mixing bowl and whisk before whipping the cream — it’ll whip faster and hold better.
For the Topping
- 1 cup heavy whipping cream – Freshly whipped for a light, pillowy top layer.
- 2 tablespoons powdered sugar – Sweetens the cream without making it heavy.
- ½ cup mini marshmallows (optional) – For a fun, textured finish that looks beautiful on top! Variation Idea: Toast the marshmallows lightly with a kitchen torch before serving for that golden, campfire-inspired touch.
Instructions
This no-bake beauty comes together in three simple parts — the crust, the filling, and the topping. You’ll be amazed by how effortlessly it transforms into a show-stopping dessert that tastes like a cloud.
Step 1: Make the Crust
- Combine the crumbs and sugar.
In a medium bowl, mix together the graham cracker crumbs and sugar until evenly blended. The mixture should feel slightly sandy. - Add the melted butter.
Pour in the melted butter and stir until the crumbs are evenly coated and start clumping together. You’re looking for that perfect, damp sand texture that presses easily but doesn’t drip with butter. - Press into the pan.
Transfer the crumb mixture to a 9-inch springform pan. Use the bottom of a glass or measuring cup to press it down firmly and evenly across the base.
Pro tip: Run the glass gently along the edges to keep the crust neat and compact. - Chill to set.
Pop the crust into the fridge while you prepare the filling — about 15–20 minutes is all it takes to firm up beautifully.
Step 2: Prepare the Marshmallow Cheesecake Filling
- Beat the cream cheese.
In a large mixing bowl, use an electric mixer to beat the softened cream cheese until smooth and creamy. This step is key — no lumps allowed! - Add the sweetness.
Mix in the powdered sugar and vanilla extract, blending until everything’s silky. - Fold in the marshmallow fluff.
Add the marshmallow fluff and continue mixing until the filling is light, glossy, and irresistible. It should look like smooth frosting at this stage. - Whip the cream.
In a separate chilled bowl, whip the heavy cream to soft peaks. The cream should hold shape but still look smooth and slightly glossy. - Combine gently.
Using a spatula, fold the whipped cream into the marshmallow mixture in batches. Be gentle — this is where the fluffiness happens! You want to keep all that air inside. - Spread the filling over the crust.
Spoon the filling onto the chilled crust, smoothing the top with a spatula. It should feel light and pillowy. - Chill to set.
Cover the pan with plastic wrap and refrigerate for at least 4 hours, or overnight if you can wait. The texture becomes perfectly firm yet creamy after a long chill.
Step 3: Make the Whipped Topping
- Whip the cream.
In a clean, chilled bowl, beat 1 cup heavy whipping cream and 2 tablespoons powdered sugar until fluffy peaks form. - Top your cheesecake.
Once the cheesecake has set, remove it from the springform pan and spread the whipped cream over the top in soft, swooping motions. - Garnish with marshmallows.
Sprinkle mini marshmallows on top for a whimsical touch. For an extra treat, lightly toast them with a kitchen torch for a golden, gooey finish.
Step 4: Slice and Serve
Carefully slice with a sharp knife warmed under hot water (wipe it clean between cuts). Each slice should hold its shape perfectly while staying creamy and smooth.
Serve chilled — the contrast between the cool, velvety filling and the buttery crust is pure bliss.
Tips & Variations
One of the best things about this No-Bake Marshmallow Cheesecake is how flexible it is. You can easily make it your own with small tweaks or fun additions — it’s basically a blank canvas for dessert lovers.
Flavor Swaps
- Chocolate Dream:
Mix 2 tablespoons of cocoa powder into the crust mixture and top the cheesecake with a drizzle of melted chocolate or chocolate shavings. The marshmallow and chocolate combo gives total “s’mores cheesecake” vibes. - Berry Burst:
Swirl in a few spoonfuls of raspberry or strawberry jam into the filling before chilling. It adds a pop of color and tangy sweetness that perfectly balances the marshmallow fluff. - Coconut Cloud:
Stir ¼ cup shredded coconut into the filling and top with toasted coconut flakes for a tropical twist. - Peanut Butter Lovers:
Add ¼ cup creamy peanut butter to the filling and sprinkle chopped peanuts or peanut butter cups on top for a sweet-salty treat.
Add-Ons for Presentation
Pinterest loves pretty desserts, and presentation really makes this cheesecake shine. Here are a few quick ideas:
- Drizzle it: A light drizzle of caramel or chocolate syrup right before serving looks beautiful and adds richness.
- Sprinkle magic: Try crushed graham crackers, chocolate curls, or pastel sprinkles for a photo-worthy finish.
- Mini versions: Make it in small mason jars or cupcake liners for bite-sized servings — perfect for parties and dessert boards.
Storage Tips
You’ll be happy to know this cheesecake stores beautifully. Here’s how to keep it fresh and fluffy:
- In the fridge: Store covered in the refrigerator for up to 4–5 days. It actually tastes even better after the first day as the flavors blend.
- In the freezer: Freeze slices individually wrapped in plastic and stored in an airtight container for up to 1 month. Thaw in the fridge overnight before serving.
- Avoid room temperature: Since it’s dairy-based, keep it chilled until ready to serve. Pro tip: If you’re making it ahead for a party, you can prepare it up to 24 hours in advance — just add the whipped topping right before serving to keep it picture-perfect.
Serving Suggestions
You’ve made it this far — now comes the fun part: serving and styling your No-Bake Marshmallow Cheesecake! Whether you’re sharing it at a cozy family dinner or a festive holiday gathering, presentation can take this dessert from simple to stunning.
How to Serve It
- Chilled and Creamy:
Always serve this cheesecake cold. The texture is soft, silky, and mousse-like — exactly what makes it so special. If it’s been in the fridge for a while, let it sit at room temperature for just 5 minutes before slicing for the perfect consistency. - Clean Cuts, Every Time:
For those perfect, Pinterest-worthy slices, dip a sharp knife in hot water, wipe it clean, and slice with a single downward motion. Repeat for each cut. This keeps the edges smooth and camera-ready. - Add a Little Drizzle:
A touch of chocolate syrup, caramel sauce, or berry compote over each slice adds both flavor and flair. It’s the easiest way to make your cheesecake look like it came from a bakery display case.
Perfect Pairings
Want to turn your cheesecake into the star of a full dessert spread? Try pairing it with:
- Fresh berries – Strawberries, raspberries, or blueberries add a refreshing contrast to the sweetness.
- Hot coffee or espresso – The bitterness of coffee pairs beautifully with the creamy marshmallow filling.
- A tall glass of milk – Classic, comforting, and especially great for kids.
- Hot cocoa – For an over-the-top dessert moment, serve your cheesecake with rich homemade cocoa and a few mini marshmallows on top.
Presentation Tips
Because let’s be honest — we all want that “wow” moment when we bring dessert to the table (or post it online).
- Top with texture: Try a handful of crushed graham crackers, toasted marshmallows, or even a dusting of cocoa powder for dimension.
- Add color: A few fresh mint leaves or berries make a simple but eye-catching garnish.
- Use a glass stand: Elevate your cheesecake (literally!) for that effortless, elegant look in photos and at parties. Bonus Tip: If you’re styling for Pinterest, photograph the cheesecake near natural light and sprinkle a few extra marshmallows around the plate for a cozy, inviting vibe.
Frequently Asked Questions (FAQs)
1. Can I make this Marshmallow Cheesecake ahead of time?
Absolutely! This cheesecake actually tastes better when made ahead because the filling has time to set and the flavors deepen. You can make it up to 24 hours in advance — just keep it covered in the fridge and add the whipped topping right before serving for the freshest look.
2. What can I use instead of marshmallow fluff?
If you don’t have marshmallow fluff on hand, you can melt regular marshmallows with a tablespoon of butter over low heat until smooth. Let it cool slightly before adding it to the cream cheese mixture. The texture will be slightly denser but still delicious.
3. Can I make this cheesecake gluten-free?
Yes! Simply swap out the graham cracker crumbs for your favorite gluten-free cookies or graham-style crackers. Everything else in the recipe is naturally gluten-free. Just be sure to check your marshmallow fluff label if you’re sensitive to cross-contamination.
4. How do I keep the filling light and fluffy?
The secret is in the whipped cream. Make sure your heavy cream is very cold, and gently fold it into the marshmallow mixture with a spatula instead of stirring. This keeps all that air you whipped in — giving your cheesecake that dreamy, cloud-like texture.
5. Can I freeze Marshmallow Cheesecake?
Definitely! You can freeze it whole or in slices. Wrap each slice tightly in plastic wrap, then place it in an airtight container. It’ll keep for up to 1 month. To serve, thaw it in the refrigerator overnight. The texture stays creamy and smooth!
6. What’s the best pan to use for this recipe?
A 9-inch springform pan works best for easy removal and clean edges. If you don’t have one, a deep pie dish or square pan will also work — just line it with parchment paper for easy lifting when serving.
Final Thoughts
There’s something so special about desserts that bring both comfort and a little bit of magic to the table — and this No-Bake Marshmallow Cheesecake is exactly that. It’s simple, sweet, and undeniably satisfying. Whether you’re making it for a holiday, a birthday, or just a “because it’s Tuesday” kind of treat, it never fails to impress. The smooth marshmallow filling and buttery crust create that perfect bite — nostalgic yet elegant, indulgent yet light.
And the best part? You don’t have to be a professional baker to pull it off. With just a few basic ingredients and a little fridge time, you’ll have a dessert that looks like it came straight out of a bakery window. Once you’ve mastered this one, try branching out into other no-bake favorites like this silky Oreo cheesecake from Handle the Heat — it’s another crowd-pleaser that pairs beautifully with coffee and conversation.
So go ahead — chill, slice, and serve up a little piece of happiness. Your guests (and your Pinterest board) will thank you.
Print
No-Bake Marshmallow Cheesecake: A Fluffy, Dreamy Dessert You’ll Fall in Love With
Description
| This easy, no-bake Marshmallow Cheesecake is the perfect mix of creamy, fluffy, and buttery. With a graham cracker crust and marshmallow-cream filling, it’s a dreamy dessert that looks bakery-perfect but takes just minutes to make. Serve it chilled for a crowd-pleasing treat that’s as simple as it is stunning. |
Ingredients
For the Crust:
1 ½ cups graham cracker crumbs
¼ cup granulated sugar
½ cup unsalted butter, melted
For the Filling:
8 oz cream cheese, softened
1 cup marshmallow fluff
½ cup powdered sugar
1 tsp pure vanilla extract
1 cup heavy whipping cream, whipped
For the Topping:
1 cup heavy whipping cream
2 tbsp powdered sugar
½ cup mini marshmallows (optional)
Instructions
| 1. Mix graham cracker crumbs and sugar, then stir in melted butter. Press into a 9-inch springform pan and chill for 15–20 minutes. 2. In a bowl, beat cream cheese until smooth. Add powdered sugar and vanilla, then mix in marshmallow fluff until light and glossy. 3. Whip the heavy cream to soft peaks and gently fold it into the marshmallow mixture. 4. Spread filling over crust, cover, and refrigerate for at least 4 hours or overnight. 5. Whip the topping cream with powdered sugar, spread over cheesecake, and top with mini marshmallows before serving. |
Notes
| • For a gluten-free version, use gluten-free graham crackers. • Chill your bowl before whipping cream for best results. • Try adding a drizzle of chocolate or caramel for extra flavor. • Cheesecake can be frozen for up to 1 month and thawed overnight. |