
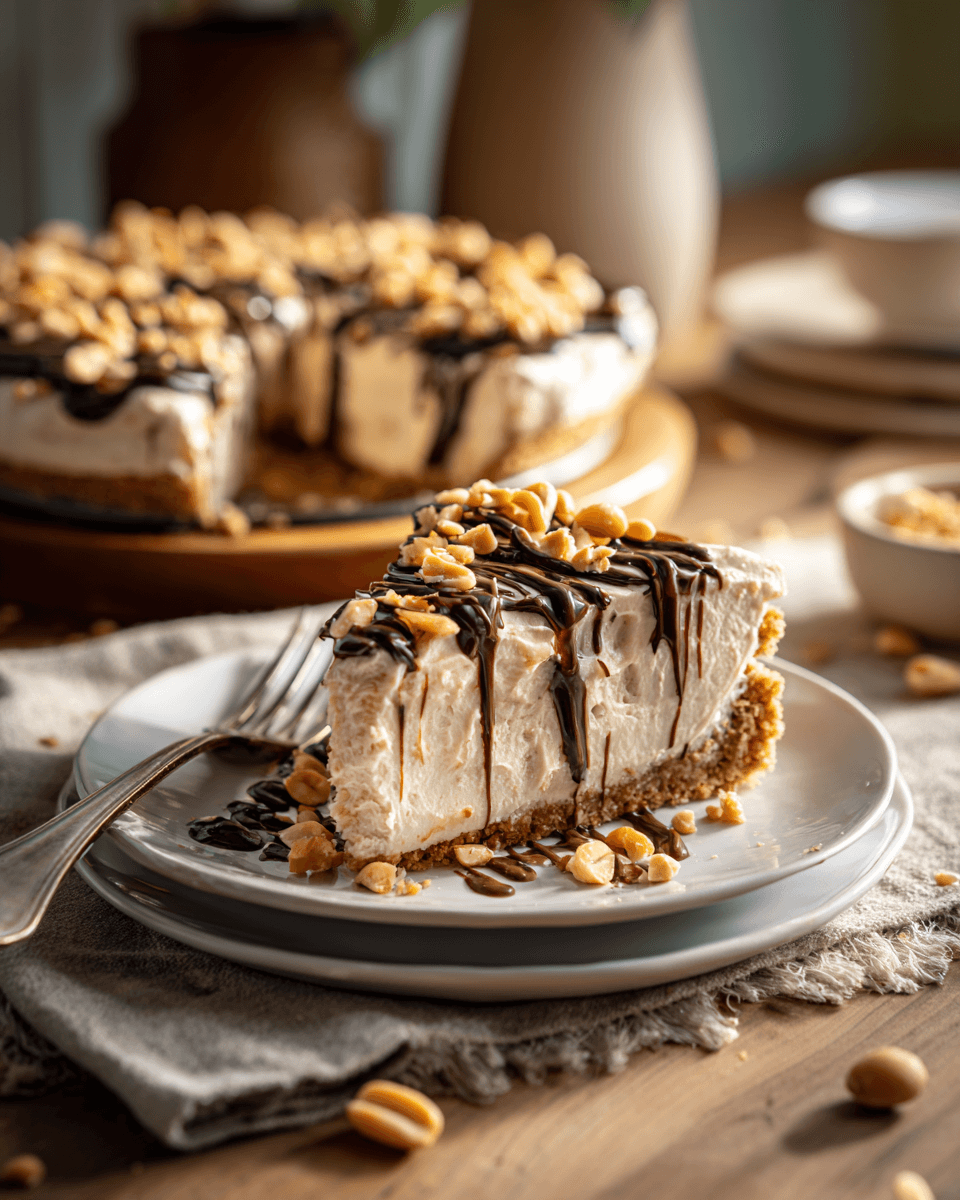
If you’re anything like me, there are days when you crave something sweet, comforting, and just a little indulgent — but turning on the oven feels like a dealbreaker. That’s where this easy no-bake peanut butter pie swoops in and saves the day. It’s the kind of dessert that looks fancy enough for guests but secretly takes almost no effort to make. You’ll only need a few pantry staples and a bit of chill time — no baking required. I first made this pie on a humid summer evening when I wanted something that tasted like a mix between peanut butter fudge and cheesecake. Let’s just say… it didn’t last 24 hours in the fridge.
There’s something so nostalgic about the combination of chocolate, peanut butter, and whipped cream — it’s a flavor trio that never goes out of style. This pie has quickly become my go-to for cookouts, potlucks, and movie nights because it’s that easy and that good. Plus, it travels beautifully and keeps well in the fridge. If you love simple, make-ahead desserts, you’ll probably enjoy browsing through Sally’s Baking Addiction’s collection of no-bake recipes — they’re full of delicious ideas for sweet treats you can whip up in minutes.
Ingredients You’ll Need
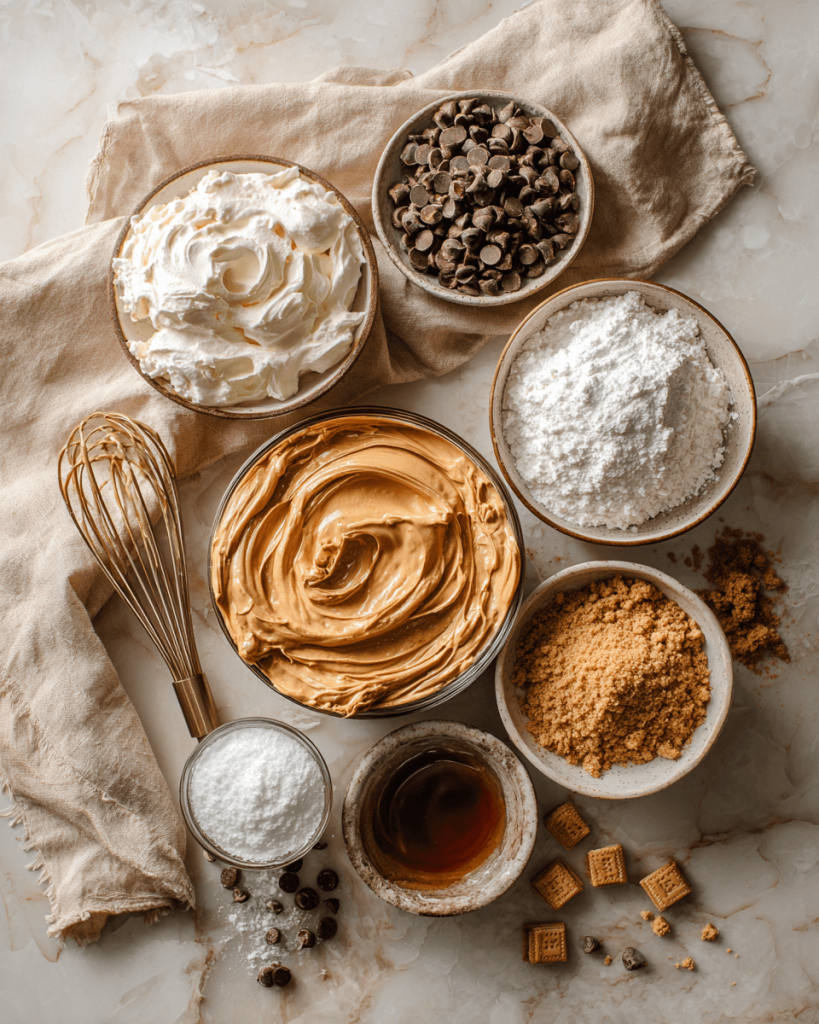
This pie comes together with a handful of pantry staples — nothing fancy, just simple ingredients that create pure dessert magic. Here’s what you’ll need to make your easy no-bake peanut butter pie:
For the Crust
- 24 Oreo cookies – Crush them into fine crumbs for that classic chocolatey base. You can use a food processor or seal them in a bag and roll with a pin (fun stress relief!).
- 5 tablespoons unsalted butter, melted – Helps the crust hold its shape and adds a subtle richness. If you love a firmer crust, add an extra tablespoon.
For the Filling
- 1 cup creamy peanut butter – Smooth peanut butter gives the filling that velvety texture. Skip the natural kind here — the oil separation can make it too loose.
- 8 oz cream cheese, softened – Brings a slight tang that balances all the sweetness. Let it come to room temperature so it blends easily.
- 1 cup powdered sugar – Sweetens the pie while keeping the filling fluffy. Don’t substitute with granulated sugar — it won’t dissolve properly.
- 1 teaspoon pure vanilla extract – Adds warmth and depth. Trust me, a splash of real vanilla makes all the difference.
- 1 ½ cups heavy whipping cream – Whipped into soft peaks for that dreamy, cloud-like texture. You can use store-bought whipped topping in a pinch, but fresh cream tastes divine.
For the Topping (Optional but Highly Recommended!)
- Chopped peanuts – A sprinkle on top adds crunch and visual appeal.
- Chocolate or butterscotch syrup – Drizzle generously for a bakery-style finish.
- Mini peanut butter cups or chocolate curls – Totally optional, but they make your pie Pinterest-photo ready.
Step-by-Step Instructions
This no-bake peanut butter pie is as easy as it gets — no oven, no fancy gadgets, and no stress. Just creamy layers, a little patience, and a whole lot of flavor.
Step 1: Make the Crust
Start by crushing your Oreo cookies into fine crumbs. You can toss them into a food processor or go old-school with a zip-top bag and rolling pin. You’re looking for a sandy, even texture — not chunky.
In a medium bowl, pour in the melted butter and stir until every crumb is coated and slightly glossy. Press the mixture firmly into the bottom and sides of a 9-inch pie dish. The back of a spoon or the bottom of a glass works perfectly here. Pop it into the fridge while you prep the filling so it can set.
Step 2: Whip the Cream
In a chilled mixing bowl, whip your heavy cream until soft peaks form — light and airy, but still holding shape. This usually takes 2–3 minutes with an electric mixer on medium speed. Set it aside; we’ll fold it in at the end for that cloud-like texture.
Step 3: Make the Peanut Butter Filling
In another large bowl, beat together the softened cream cheese and peanut butter until smooth and fluffy — it should look silky and thick. Gradually mix in the powdered sugar and vanilla extract until fully combined. The aroma here? Pure peanut butter heaven.
Step 4: Fold in the Whipped Cream
Now comes the magic moment. Using a rubber spatula, gently fold the whipped cream into the peanut butter mixture in batches. Don’t rush it — this keeps your filling light and mousse-like. Once it’s smooth and uniform, you’ll want to sneak a spoonful (and yes, it’s allowed).
Step 5: Fill and Chill
Pour the filling into your prepared crust and smooth out the top with an offset spatula or the back of a spoon. It should look rich, fluffy, and tempting. Cover the pie loosely with plastic wrap and chill for at least 2 hours (overnight is even better) until it’s set and sliceable.
Step 6: Garnish and Serve
When it’s time to serve, let your creativity shine. Drizzle chocolate or butterscotch syrup over the top, scatter some chopped peanuts for crunch, or crown it with mini peanut butter cups. The combination of creamy filling, crunchy crust, and cold, fudgy topping is pure dessert bliss.
Tips & Variations
This recipe is wonderfully flexible — you can tweak it to match your cravings, the season, or what’s already in your pantry. Here are some tried-and-true tips and flavor variations to make your pie truly your own.
Make-Ahead Magic
One of the best things about this pie is that it actually gets better with time. The flavors deepen as it chills, making it a perfect make-ahead dessert for holidays, cookouts, or busy weekends. You can prepare it up to 2 days in advance, cover it tightly, and refrigerate until serving.
Flavor Variations
- Chocolate Lovers’ Twist: Add 2 tablespoons of cocoa powder or a layer of melted chocolate between the crust and the filling for extra decadence.
- Nutella Swirl: Fold in a few spoonfuls of Nutella for a hazelnut-peanut butter combo that tastes like a candy bar.
- Salted Caramel Dream: Drizzle caramel sauce over the filling before chilling, then sprinkle flaky sea salt on top for that irresistible sweet-salty balance.
- Banana Cream Pie Hybrid: Layer thin banana slices between the crust and filling — a fun tropical twist that pairs beautifully with peanut butter.
Ingredient Swaps
- Cookies: No Oreos? Try graham crackers, Nutter Butters, or chocolate wafers for a different base.
- Whipped Cream: Short on time? Use an 8-ounce tub of whipped topping instead of homemade whipped cream. It’s not quite as rich, but still delicious.
- Peanut Butter: If you’re feeling adventurous, swap peanut butter for almond or cashew butter. Just stick with creamy, not crunchy, for the best texture.
Storage Tips
- Refrigerate: Keep the pie covered in the fridge for up to 5 days. It holds its texture beautifully.
- Freeze for Later: Want to save a few slices? Wrap them tightly in plastic wrap and freeze for up to 2 months. Thaw in the fridge overnight before serving — it tastes like frozen peanut butter mousse!
Bonus Tip
If you’re serving for a crowd, try making mini peanut butter pies in small ramekins or muffin tins lined with paper cups. They’re adorable, portion-friendly, and perfect for parties or gifting.Tips & Variations
This recipe is wonderfully flexible — you can tweak it to match your cravings, the season, or what’s already in your pantry. Here are some tried-and-true tips and flavor variations to make your pie truly your own.
Make-Ahead Magic
One of the best things about this pie is that it actually gets better with time. The flavors deepen as it chills, making it a perfect make-ahead dessert for holidays, cookouts, or busy weekends. You can prepare it up to 2 days in advance, cover it tightly, and refrigerate until serving.
Flavor Variations
- Chocolate Lovers’ Twist: Add 2 tablespoons of cocoa powder or a layer of melted chocolate between the crust and the filling for extra decadence.
- Nutella Swirl: Fold in a few spoonfuls of Nutella for a hazelnut-peanut butter combo that tastes like a candy bar.
- Salted Caramel Dream: Drizzle caramel sauce over the filling before chilling, then sprinkle flaky sea salt on top for that irresistible sweet-salty balance.
- Banana Cream Pie Hybrid: Layer thin banana slices between the crust and filling — a fun tropical twist that pairs beautifully with peanut butter.
Ingredient Swaps
- Cookies: No Oreos? Try graham crackers, Nutter Butters, or chocolate wafers for a different base.
- Whipped Cream: Short on time? Use an 8-ounce tub of whipped topping instead of homemade whipped cream. It’s not quite as rich, but still delicious.
- Peanut Butter: If you’re feeling adventurous, swap peanut butter for almond or cashew butter. Just stick with creamy, not crunchy, for the best texture.
Storage Tips
- Refrigerate: Keep the pie covered in the fridge for up to 5 days. It holds its texture beautifully.
- Freeze for Later: Want to save a few slices? Wrap them tightly in plastic wrap and freeze for up to 2 months. Thaw in the fridge overnight before serving — it tastes like frozen peanut butter mousse!
Bonus Tip
If you’re serving for a crowd, try making mini peanut butter pies in small ramekins or muffin tins lined with paper cups. They’re adorable, portion-friendly, and perfect for parties or gifting.
How to Serve This Peanut Butter Pie
This pie is the kind of dessert that practically serves itself — creamy, chilled, and beautifully sliceable. But if you want to take things up a notch (and get those perfect “save-worthy” Pinterest photos), here are a few fun ways to serve and style it.
1. Keep It Classic (and Crowd-Pleasing)
Serve the pie chilled, straight from the fridge, with a drizzle of chocolate or butterscotch syrup over each slice. A dollop of whipped cream and a few chopped peanuts instantly make it look bakery-worthy. It’s simple, elegant, and absolutely irresistible.
2. Add a Little Crunch
Texture makes every bite more exciting. Sprinkle crushed Oreos or pretzel bits over the top for a sweet-and-salty contrast. You can even add a thin layer of melted chocolate under the filling before chilling for a firm, candy-bar-like base.
3. Pair It With a Drink
This pie pairs beautifully with coffee, cold brew, or a tall glass of milk (classic comfort combo!). If you’re feeling fancy, serve it alongside an iced mocha or a peanut butter milkshake for a fully themed dessert moment.
4. Make It Party-Ready
Hosting a get-together? Slice your pie into small squares or wedges and serve it on mini dessert plates with gold forks — it feels instantly special. Add a sprinkle of cocoa powder or powdered sugar over the top just before serving for a professional touch.
5. For the Photo-Perfect Finish
Want that swoon-worthy Pinterest photo? Here’s the secret:
- Wipe your knife clean between slices for perfect edges.
- Add extra drizzles after cutting — they’ll look naturally glossy.
- Place your pie on a white or marble surface for contrast, and let the creamy filling be the star.
6. Seasonal Touches
You can easily make this pie festive year-round. Add mini peanut butter cups and caramel drizzle for Halloween, sprinkle crushed peppermint for a winter treat, or top with sliced strawberries for a spring refresh.
FAQs About Peanut Butter Pie
1. Can I use crunchy peanut butter instead of creamy?
You can, but be prepared for a slightly different texture. Crunchy peanut butter adds a fun bit of bite, though the filling won’t be as silky-smooth. If you love a little texture, try using half creamy and half crunchy for the best of both worlds.
2. How long does peanut butter pie last in the fridge?
Your pie will stay fresh and delicious for up to 5 days in the refrigerator. Just keep it tightly covered with plastic wrap or foil to prevent it from absorbing fridge odors. It actually tastes even better the next day after all the flavors settle.
3. Can I make this pie ahead of time?
Absolutely! This is one of those desserts that’s even better when made ahead. Prepare it up to 48 hours in advance, cover, and chill. The filling firms up beautifully, making it super easy to slice and serve when you’re ready.
4. Can I freeze peanut butter pie?
Yes — and it’s delicious frozen! Wrap individual slices or the whole pie in plastic wrap, then place it in an airtight container or freezer bag. It will keep for up to 2 months. To serve, just thaw it in the fridge overnight (or enjoy it half-frozen like a peanut butter ice cream cake).
5. How do I make this dessert lighter or less sweet?
You can swap the heavy cream for whipped coconut cream and reduce the powdered sugar to ¾ cup. The texture will be slightly looser but still creamy and satisfying. Using dark chocolate cookies or bittersweet chocolate drizzle can also balance the sweetness.
6. Can I turn this recipe into mini pies or bars?
Definitely! For mini pies, divide the crust and filling among small jars, ramekins, or muffin cups. For bars, press the crust into an 8×8-inch pan, spread the filling evenly, and chill before slicing. These versions are great for parties, potlucks, or gifting.FAQs About Peanut Butter Pie
1. Can I use crunchy peanut butter instead of creamy?
You can, but be prepared for a slightly different texture. Crunchy peanut butter adds a fun bit of bite, though the filling won’t be as silky-smooth. If you love a little texture, try using half creamy and half crunchy for the best of both worlds.
2. How long does peanut butter pie last in the fridge?
Your pie will stay fresh and delicious for up to 5 days in the refrigerator. Just keep it tightly covered with plastic wrap or foil to prevent it from absorbing fridge odors. It actually tastes even better the next day after all the flavors settle.
3. Can I make this pie ahead of time?
Absolutely! This is one of those desserts that’s even better when made ahead. Prepare it up to 48 hours in advance, cover, and chill. The filling firms up beautifully, making it super easy to slice and serve when you’re ready.
4. Can I freeze peanut butter pie?
Yes — and it’s delicious frozen! Wrap individual slices or the whole pie in plastic wrap, then place it in an airtight container or freezer bag. It will keep for up to 2 months. To serve, just thaw it in the fridge overnight (or enjoy it half-frozen like a peanut butter ice cream cake).
5. How do I make this dessert lighter or less sweet?
You can swap the heavy cream for whipped coconut cream and reduce the powdered sugar to ¾ cup. The texture will be slightly looser but still creamy and satisfying. Using dark chocolate cookies or bittersweet chocolate drizzle can also balance the sweetness.
6. Can I turn this recipe into mini pies or bars?
Definitely! For mini pies, divide the crust and filling among small jars, ramekins, or muffin cups. For bars, press the crust into an 8×8-inch pan, spread the filling evenly, and chill before slicing. These versions are great for parties, potlucks, or gifting.
Final Thoughts
There’s just something magical about a dessert that looks impressive, tastes incredible, and takes almost no effort. This easy no-bake peanut butter pie is the kind of recipe that makes you feel like a kitchen pro without breaking a sweat. It’s smooth, creamy, and perfectly indulgent — the kind of dessert that has people asking for seconds (and then the recipe). Whether you’re sharing it at a summer potluck or sneaking a midnight slice straight from the fridge, it always delivers comfort and nostalgia in every bite.
If you’re a fan of no-bake desserts that save time but never skimp on flavor, you’ll love exploring Taste of Home’s no-bake recipe collection. It’s packed with fun, easy ideas for when you need a sweet fix without turning on the oven.
So go ahead — grab that jar of peanut butter, whip up this dreamy pie, and treat yourself to something special. Because honestly, life’s too short not to have dessert waiting in the fridge.
Print
Easy No-Bake Peanut Butter Pie (Creamy, Dreamy & Totally Irresistible!)
- Total Time: 2 hours
- Yield: 6 servings 1x
Description
This easy no-bake peanut butter pie is smooth, creamy, and loaded with rich peanut butter flavor — all without turning on the oven! Made with a chocolate cookie crust and a fluffy peanut butter filling, it’s the ultimate make-ahead dessert for holidays, parties, or lazy weekends.
Ingredients
For the Crust:
24 Oreo cookies (crushed into fine crumbs)
5 tablespoons unsalted butter (melted)
For the Filling:
1 cup creamy peanut butter
8 oz cream cheese (softened)
1 cup powdered sugar
1 teaspoon pure vanilla extract
1 ½ cups heavy whipping cream
For the Topping (Optional):
Chopped peanuts
Chocolate or butterscotch syrup
Mini peanut butter cups or chocolate curls
Instructions
Make the Crust:
Crush the Oreos into fine crumbs using a food processor or rolling pin. Mix with melted butter until well combined. Press into the bottom and sides of a 9-inch pie dish. Chill while preparing the filling.
Whip the Cream:
In a cold mixing bowl, beat the heavy cream until soft peaks form. Set aside.
Prepare the Filling:
In another bowl, beat the cream cheese and peanut butter until smooth and creamy. Mix in the powdered sugar and vanilla until fully combined.
Fold Everything Together:
Gently fold the whipped cream into the peanut butter mixture until smooth and airy.
Assemble the Pie:
Pour the filling into the chilled crust. Smooth the top, cover, and refrigerate for at least 2 hours (or overnight) until set.
Garnish and Serve:
Drizzle with chocolate or butterscotch syrup and sprinkle with chopped peanuts before serving. Slice, serve chilled, and enjoy!
Notes
Make-Ahead Tip: You can make this pie up to 2 days in advance. Keep it refrigerated and covered until ready to serve.
Freezer Option: Wrap slices tightly and freeze for up to 2 months. Thaw overnight in the fridge.
Flavor Variations: Add a drizzle of caramel or a swirl of Nutella for a fun twist.
No Mixer? A whisk and some arm power will do just fine — this pie is forgiving and easy!
- Prep Time: 20 minutes
- Cook Time: 0 minutes
- Category: Dessert
- Method: No-Bake
- Cuisine: American
Nutrition
- Serving Size: 1 slice
- Calories: 520kcl
- Sugar: 24g
- Sodium: 260mg
- Fat: 38g
- Saturated Fat: 17 g
- Unsaturated Fat: 19g
- Trans Fat: 0g
- Carbohydrates: 35g
- Fiber: 2g
- Protein: 9g
- Cholesterol: 70mg
Keywords: easy peanut butter pie, no bake dessert, creamy peanut butter pie, peanut butter cream cheese pie